<!DOCTYPE html>
	<html lang="vi" xmlns="http://www.w3.org/1999/xhtml" prefix="og: http://ogp.me/ns#">
	<head>
<title>Làm thế nào để cứu dữ liệu bị ghost nhầm HDD?</title>
<meta name="description" content="Làm thế nào để cứu dữ liệu bị ghost nhầm HDD? - Savefile - Tin Tức -...">
<meta name="author" content="Văn Phòng Phẩm, Máy Văn Phòng Tiến Thành - CÔNG TY TNHH TM QUỐC TẾ TIẾN THÀNH">
<meta name="copyright" content="Văn Phòng Phẩm, Máy Văn Phòng Tiến Thành - CÔNG TY TNHH TM QUỐC TẾ TIẾN THÀNH">
<meta name="robots" content="index, archive, follow, noodp">
<meta name="googlebot" content="index,archive,follow,noodp">
<meta name="msnbot" content="all,index,follow">
<meta name="generator" content="STC Infotech - Thiết kế website chuyên nghiệp Hải Dương - Hotline: 0969. 382 007">
<meta name="viewport" content="width=device-width, initial-scale=1">
<meta http-equiv="Content-Type" content="text/html; charset=utf-8">
<meta property="og:title" content="Làm thế nào để cứu dữ liệu bị ghost nhầm HDD?">
<meta property="og:type" content="website">
<meta property="og:description" content="Savefile - Tin Tức - https&#x3A;&#x002F;&#x002F;tienthanhltd.com.vn&#x002F;news&#x002F;savefile&#x002F;tin-tuc-su-kien&#x002F;lam-the-nao-de-cuu-du-lieu-bi-ghost-nham-hdd-69.html">
<meta property="og:site_name" content="Văn Phòng Phẩm, Máy Văn Phòng Tiến Thành - CÔNG TY TNHH TM QUỐC TẾ TIẾN THÀNH">
<meta property="og:url" content="https://vanphongphamhaiduong.com.vn/news/tin-tuc-su-kien/lam-the-nao-de-cuu-du-lieu-bi-ghost-nham-hdd-69.html">
<link rel="shortcut icon" href="https://tienthanhltd.com.vn/uploads/tienthanh.png">
<link rel="canonical" href="https://vanphongphamhaiduong.com.vn/news/tin-tuc-su-kien/lam-the-nao-de-cuu-du-lieu-bi-ghost-nham-hdd-69.html">
<link rel="alternate" href="https://tienthanhltd.com.vn/news/rss/" title="Tin Tức" type="application/rss+xml">
<link rel="alternate" href="https://tienthanhltd.com.vn/news/rss/tin-tuc-su-kien/" title="Tin Tức - Tin Tức - Sự kiện" type="application/rss+xml">
<link rel="alternate" href="https://tienthanhltd.com.vn/news/rss/thu-thuat-cong-nghe-thong-tin/" title="Tin Tức - Thủ Thuật Công Nghệ Thông Tin" type="application/rss+xml">
<link rel="preload" as="script" href="https://tienthanhltd.com.vn/assets/js/jquery/jquery.min.js">
<link rel="preload" as="script" href="https://tienthanhltd.com.vn/assets/js/language/vi.js">
<link rel="preload" as="script" href="https://tienthanhltd.com.vn/assets/js/global.js">
<link rel="preload" as="script" href="https://tienthanhltd.com.vn/assets/js/SmoothScroll.js">
<link rel="preload" as="script" href="https://tienthanhltd.com.vn/themes/default/js/news.js">
<link rel="preload" as="script" href="https://tienthanhltd.com.vn/themes/default/js/sticky-sidebar.js">
<link rel="preload" as="script" href="https://tienthanhltd.com.vn/themes/default/js/main.js">
<link rel="preload" as="script" href="https://tienthanhltd.com.vn//code.tidio.co/0oeiaqm3amrvxuupjhbgwcbdeq5btbh0.js">
<link rel="preload" as="script" href="https://tienthanhltd.com.vn/themes/default/js/bootstrap.min.js">
<link rel="StyleSheet" href="https://tienthanhltd.com.vn/assets/css/font-awesome.min.css">
<link rel="StyleSheet" href="https://tienthanhltd.com.vn/themes/default/css/bootstrap.min.css">
<link rel="StyleSheet" href="https://tienthanhltd.com.vn/themes/default/css/style.css">
<link rel="StyleSheet" href="https://tienthanhltd.com.vn/themes/default/css/style.responsive.css">
<link rel="StyleSheet" href="https://tienthanhltd.com.vn/themes/default/css/news.css">
<link rel="StyleSheet" href="https://tienthanhltd.com.vn/assets/css/default.vi.0.css?t=47">
<style>
	body{background: #fff;}
</style>
	</head>
	<body>
<div id="print">
	<div id="hd_print">
		<h2 class="pull-left">Văn Phòng Phẩm, Máy Văn Phòng Tiến Thành - CÔNG TY TNHH TM QUỐC TẾ TIẾN THÀNH</h2>
		<p class="pull-right"><a title="Văn Phòng Phẩm, Máy Văn Phòng Tiến Thành - CÔNG TY TNHH TM QUỐC TẾ TIẾN THÀNH" href="https://tienthanhltd.com.vn/">https://tienthanhltd.com.vn</a></p>
	</div>
	<div class="clear"></div>
	<hr />
	<div id="content">
		<h1>Làm thế nào để cứu dữ liệu bị ghost nhầm HDD?</h1>
		<ul class="list-inline">
			<li>Thứ ba - 27/08/2019 22:31</li>
			<li class="hidden-print txtrequired"><em class="fa fa-print">&nbsp;</em><a title="In ra" href="javascript:;" onclick="window.print()">In ra</a></li>
			<li class="hidden-print txtrequired"><em class="fa fa-power-off">&nbsp;</em><a title="Đóng cửa sổ này" href="javascript:;" onclick="window.close()">Đóng cửa sổ này</a></li>
		</ul>
		<div class="clear"></div>
		<div id="hometext">
		</div>
		<div id="bodytext" class="clearfix">
			<span style="font-size:18px;"><span style="font-family:Times New Roman,Times,serif;"><strong><em>Làm thế nào để cứu dữ liệu bị ghost nhầm ? Một câu hỏi được rất rất nhiều người quan tâm. Đây thực sự là một trường hợp rất thường gặp trong quá trình sửa chữa và cài đặt lại máy tính. Chỉ cần sơ xuất một bước thôi là dữ liệu của bạn sẽ tan thành mây khói ngay. Xin chia sẻ 2 cách sau, hi vọng có thể giúp các bạn cứu được dữ liệu quan trọng của mình khi rơi vào trường hợp oái oăm này.</em></strong></span></span><h2><span style="font-size:24px;"><span style="font-family:Times New Roman,Times,serif;"><strong>1. Cần lưu ý gì khi bị ghost nhầm?</strong></span></span></h2><p><span style="font-size:18px;"><span style="font-family:Times New Roman,Times,serif;">Thực chất thì dữ liệu trên ổ cứng chỉ bị mất khi bị ghi đè dữ liệu lên thôi, còn nếu như bạn chưa bị ghi đè&nbsp;thì nó&nbsp;chỉ bị ẩn đi (kể cả khi bạn thực hiện Delete hay Format phân vùng) để cho phép ghi các dữ liệu mới lên.&nbsp;Chính vì thế mà&nbsp;bạn có thể&nbsp;dễ dàng cứu được toàn bộ dữ liệu ở các phân vùng&nbsp;ổ D, E… bởi ổ đó&nbsp;chỉ đang trong trạng thái ẩn mà thôi.</span></span></p><p><span style="font-size:18px;"><span style="font-family:Times New Roman,Times,serif;">Không chỉ riêng trường hợp ghost nhầm mà tất cả những trường hợp như format nhầm, xóa nhấm dữ liệu mà bạn muốn khôi phục lại thì bạn cần phải lưu ý những điều quan trọng sau:</span></span></p><ul>	<li><span style="font-size:18px;"><span style="font-family:Times New Roman,Times,serif;">Phải tìm cách khôi phục dữ liệu ngay, tuyệt đối không được thao tác thêm bất cứ hành động nào liên quan đến thêm, sửa, xóa dữ liệu&nbsp;để tránh việc bị ghi đè dữ liệu.</span></span></li>	<li><span style="font-size:18px;"><span style="font-family:Times New Roman,Times,serif;">Không được Format, copy, sao chép thêm các file mới.</span></span></li>	<li><span style="font-size:18px;"><span style="font-family:Times New Roman,Times,serif;">Nếu bạn không tự cứu dữ liệu được thì hãy mang ra các trung tâm cứu hộ máy tính để họ giải quyết nhé, trước khi quá muộn.</span></span></li>	<li><span style="font-size:18px;"><span style="font-family:Times New Roman,Times,serif;">Đọc hết bài viết trước khi thực hiện, để có thể xác định được phương hướng giải quyết.</span></span></li></ul><h2><span style="font-size:24px;"><span style="font-family:Times New Roman,Times,serif;"><strong>2. Nguyên nhân của việc&nbsp;ghost nhầm?</strong></span></span></h2><p><span style="font-size:18px;"><span style="font-family:Times New Roman,Times,serif;">Có 2 trường hợp dẫn đến bạn ghost nhầm đó là:</span></span></p><p><span style="font-size:18px;"><span style="font-family:Times New Roman,Times,serif;"><strong>+ Trường hợp 1:</strong>&nbsp;Chọn nhầm ổ để ghost, nếu thực hiện đúng quy trình thì bạn phải ghost đè lên hệ điều hành hiện tại mà bạn muốn thay thế, nhưng bạn lại chọn nhầm sang ổ khác ví dụ như D, E, F.. dẫn đến việc mất dữ liệu. Nói chung trường hợp này thì nhẹ hơn vì nó chỉ mất dữ liệu ở phân vùng bạn ghost nhầm thôi.</span></span><br  /><strong style="font-family: &#039;Times New Roman&#039;, Times, serif; font-size: 18px;">+ Trường hợp 2:</strong><span style="font-family: &#039;Times New Roman&#039;, Times, serif; font-size: 18px;">&nbsp;Thiết lập sai khi ghost, cụ thể là như thế này:</span></p><p><span style="font-size:18px;"><span style="font-family:Times New Roman,Times,serif;">Nếu theo đúng quy trình ghost thì bạn phải chọn là&nbsp;<code>Local</code>&nbsp;=&gt;&nbsp;<code>Partiton</code>&nbsp;=&gt; chọn&nbsp;<code>From Image</code>&nbsp;để thực hiện Ghost.<br  /><img alt="2" height="472" src="https://tienthanhltd.com.vn/uploads/news/2019_08/2_2.jpg" width="636" /><br  />
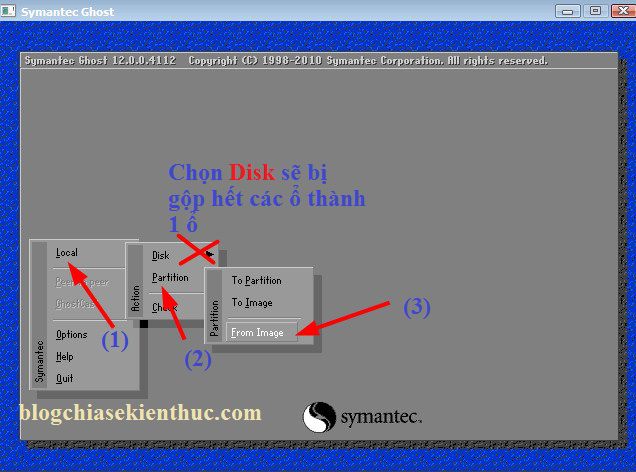
Nhưng thay vì lựa chọn như vậy. Bạn lại chọn thành&nbsp;&nbsp;<code>Local</code>&nbsp;=&gt;&nbsp;<code>Disk</code>&nbsp;=&gt; chọn&nbsp;<code>From Image</code>&nbsp;để thực hiện ghost. Lúc này tất cả các phân vùng có trên ổ cứng máy tính của bạn sẽ bị gộp lại thành một ổ duy nhất.</span></span></p><h2><span style="font-size:24px;"><span style="font-family:Times New Roman,Times,serif;"><strong>3. Làm thế nào để cứu dữ liệu khi bị ghost nhầm?</strong></span></span></h2><h3><span style="font-size:22px;"><span style="font-family:Times New Roman,Times,serif;"><strong>Cách 1: Sử dụng PartitionGuru</strong></span></span></h3><p><span style="font-size:18px;"><span style="font-family:Times New Roman,Times,serif;"><em>&lt;Khuyến khích các bạn làm theo cách này&gt;</em></span></span></p><h4><span style="font-size:18px;"><span style="font-family:Times New Roman,Times,serif;"><strong>– Bước 1: Mở phần mềm Partiton Guru</strong></span></span></h4><p><span style="font-size:18px;"><span style="font-family:Times New Roman,Times,serif;">Để giải quyết vấn đề này thì bạn hãy tải phần mềm&nbsp;Partition Guru về hoặc là bạn hãy tạo một chiếc&nbsp;<a href="https://blogchiasekienthuc.com/thu-thuat-may-tinh/tao-usb-boot-day-du-chuc-nang.html">usb boot đa năng</a>&nbsp;mà mình đã giới thiệu trước đó. Sau đó bạn hãy truy cập vào Mini Windows 7 và mở phần mềm Partition Guru ra để thực hiện.</span></span></p><p><span style="font-size:18px;"><span style="font-family:Times New Roman,Times,serif;">Vào&nbsp;<code>Disk Tools</code>&nbsp;=&gt; chọn&nbsp;<code>Partiton Guru 3.7.0<br  /><img alt="3" height="282" src="https://tienthanhltd.com.vn/uploads/news/2019_08/3_2.jpg" width="463" /></code><br  /><strong>Tips:</strong>&nbsp;Bạn cũng có thể download bản&nbsp;Partiton Guru&nbsp;Pro 4.7.2.155. Lựa chọn đúng phiên bản&nbsp;<a href="https://blogchiasekienthuc.com/thu-thuat-may-tinh/windows-32bit-va-64bit-la-gi.html">32bit hoặc 64bit</a>&nbsp;cho phù hợp với phiên bản Windows bạn đang sử dụng. Và lưu ý là bản này bạn có thể sử dụng trực tiếp trên Windows hoặc sử dụng trên WinPE (Mini Windows 7 hoặc 8..) đều được nhé.</span></span></p><h4><span style="font-size:18px;"><span style="font-family:Times New Roman,Times,serif;"><strong>– Bước 2:&nbsp;Thực hiện phục hồi lại phân vùng và dữ liệu</strong></span></span></h4><p><span style="font-size:18px;"><span style="font-family:Times New Roman,Times,serif;">Giao diện chính của PartitionGuru hiện ra, tại đây bạn hãy chọn đúng ổ cứng mà bạn đã ghost nhầm (nếu như máy tính của bạn sử dụng nhiều ổ cứng).</span></span></p><p><span style="font-size:18px;"><span style="font-family:Times New Roman,Times,serif;"><strong>Thực hiện:</strong>&nbsp;Nhấn chuột phải vào phân vùng ổ cứng đó và chọn&nbsp;<code>Search Lost Partitions (Partition Recovery)<br  /><img alt="4" height="416" src="https://tienthanhltd.com.vn/uploads/news/2019_08/4_1.jpg" width="700" /></code><br  />Hình ảnh trên hơi nhỏ thì phải, phóng to lên cái 😀<br  /><img alt="5" height="303" src="https://tienthanhltd.com.vn/uploads/news/2019_08/5_1.jpg" width="452" /><br  />Cửa sổ tiếp theo hiện ra bạn hãy tích vào lựa chọn&nbsp;<code>Whole Disk</code>&nbsp;và tích vào 2 ô kiểm&nbsp;<code>Ignore the partitions without files</code>&nbsp;và&nbsp;<code>Cylinder Aligned Partitins Only</code>. Sau đó nhấn vào&nbsp;<code>Start</code>để bắt đầu.<br  /><img alt="6" height="453" src="https://tienthanhltd.com.vn/uploads/news/2019_08/6_1.jpg" width="465" /><br  />Kết quả đầu tiên, phần mềm PartitionGuru sẽ phát hiện ra phân vùng đã bị gộp lại khi nãy bởi Norton Ghost. Bạn hãy nhấn vào&nbsp;<code>Ignore</code>&nbsp;để tiếp tục.<br  /><img alt="7" height="470" src="https://tienthanhltd.com.vn/uploads/news/2019_08/7.jpg" width="700" /></span></span><br  /><span style="font-size:18px;"><span style="font-family:Times New Roman,Times,serif;">Kết quả&nbsp;thứ 2 trả về sẽ là phân vùng ổ C (ổ chứa hệ điều hành cũ, tức là hệ điều hành trước khi bạn thực hiện ghost).</span></span></p><p><span style="font-size:18px;"><span style="font-family:Times New Roman,Times,serif;">Bạn có thể thấy nội dung của nó chính là của file Ghost mới. Bạn chọn&nbsp;<code>Reserve</code>&nbsp;để khôi phục (chú ý dữ liệu ổ C: là mới các bạn nhé).<br  /><img alt="8" height="469" src="https://tienthanhltd.com.vn/uploads/news/2019_08/8.jpg" width="700" /></span></span><br  /><span style="font-size:18px;"><span style="font-family:Times New Roman,Times,serif;">Kết quả thứ 3 các bạn sẽ được trả về các phân vùng còn lại với dữ liệu nguyên vẹn (ngay cả tên phân vùng, dung lượng phân vùng). Bạn có thể xem ở giao diện chính của chương trình để thấy điều này.</span></span></p><p><span style="font-size:18px;"><span style="font-family:Times New Roman,Times,serif;">Tiếp theo bạn hãy nhấn vào&nbsp;<code>Reserve</code>&nbsp;để thực hiện khôi phục.<br  /><img alt="9" height="380" src="https://tienthanhltd.com.vn/uploads/news/2019_08/9.jpg" width="700" /></span></span><br  /><span style="font-size:18px;"><span style="font-family:Times New Roman,Times,serif;"><strong>– Bước 3: Lưu lại kết quả</strong></span></span></p><p><span style="font-size:18px;"><span style="font-family:Times New Roman,Times,serif;">Sau khi thực hiện khôi phục lại hết các phân vùng và dữ liệu thì bạn hãy lưu lại bằng cách nhấn vào&nbsp;<code>Disk</code>&nbsp;=&gt; và chọn&nbsp;<code>Save Partition Tabe (F8)</code>.<br  /><img alt="10" height="351" src="https://tienthanhltd.com.vn/uploads/news/2019_08/10.jpg" width="700" /><br  />Done!</span></span></p><h3><span style="font-size:22px;"><span style="font-family:Times New Roman,Times,serif;"><strong>Cách 2: Sử&nbsp;dụng&nbsp;Partition Find And Mount</strong></span></span></h3><p><span style="font-size:18px;"><span style="font-family:Times New Roman,Times,serif;">Thêm một cách nữa cho các bạn đó là sử dụng phần mềm phục hồi dữ liệu có trong usb đa năng đó là&nbsp;<strong>Partition Find And Mount</strong>.</span></span></p><p><span style="font-size:18px;"><span style="font-family:Times New Roman,Times,serif;"><strong>+ Bước 1: </strong>Truy cập vào Mini Windows 7 hoặc 8.. sau đó mở phần mềm&nbsp;<strong>Partition Final And Mount&nbsp;</strong>như hình dưới đây.<br  /><img alt="11" height="470" src="https://tienthanhltd.com.vn/uploads/news/2019_08/11.jpg" width="422" /></span></span><br  /><span style="font-size:18px;"><span style="font-family:Times New Roman,Times,serif;"><strong>+ Bước 2: </strong>Chọn đúng ổ cứng bạn muốn khôi phục dữ liệu</span></span></p><p><span style="font-size:18px;"><span style="font-family:Times New Roman,Times,serif;">Tại giao diện chính của chương trình bạn hãy nhấn vào&nbsp;<code>Scan</code>&nbsp;=&gt; chọn đúng ổ cứng của bạn cần cứu dữ liệu nếu như máy tính bạn sử dụng nhiều ổ cứng (bạn có thể dựa vào dung lượng để xác định)<br  /><img alt="12" height="195" src="https://tienthanhltd.com.vn/uploads/news/2019_08/12.jpg" width="650" /><br  /><strong>+ Bước 3:</strong> Bước này bạn hãy nhấn vào&nbsp;<code>Thorough Scan</code>&nbsp;và nhấn vào&nbsp;<code>Scan</code>&nbsp;để thực hiện.<br  /><img alt="13" height="369" src="https://tienthanhltd.com.vn/uploads/news/2019_08/13.jpg" width="650" /></span></span></p><p><span style="font-size:18px;"><span style="font-family:Times New Roman,Times,serif;"><strong>+ Bước 4:</strong> Đợi..</span></span><br  /><span style="font-size:18px;"><span style="font-family:Times New Roman,Times,serif;">Quá trình quét đang diễn ra, nhanh hay chậm thì còn tùy thuộc vào dung lượng dữ liệu mà bạn cần cứu.<br  /><img alt="14" height="233" src="https://tienthanhltd.com.vn/uploads/news/2019_08/14.jpg" width="650" /></span></span><br  /><span style="font-size:18px;"><span style="font-family:Times New Roman,Times,serif;"><strong>+ Bước 5:</strong> Xác định phân vùng mà bạn cần cứu, bỏ qua những phân vùng nhỏ có dung lượng mấy chục MB nhé.</span></span></p><p><span style="font-size:18px;"><span style="font-family:Times New Roman,Times,serif;">Nhấn chuột phải vào phân vùng mà bạn muốn cứu dữ liệu (dựa vào dung lượng phân vùng để xác định) =&gt; chọn&nbsp;<code>Mount As</code>&nbsp;và đặt 1 ký tự có nó. Ví dụ mình sẽ đặt là&nbsp;<code>G</code>&nbsp;nhé.<br  /><img alt="15" height="317" src="https://tienthanhltd.com.vn/uploads/news/2019_08/15.jpg" width="650" /></span></span><br  /><strong><span style="font-size:18px;"><span style="font-family:Times New Roman,Times,serif;">+ Bước 6: </span></span></strong><span style="font-size:18px;"><span style="font-family:Times New Roman,Times,serif;">Hoàn thành</span></span></p><p><span style="font-size:18px;"><span style="font-family:Times New Roman,Times,serif;">Chờ cho dữ liệu hiện ra, bạn sẽ thấy dữ liệu còn nguyên 100%<br  /><img alt="16" height="414" src="https://tienthanhltd.com.vn/uploads/news/2019_08/16.jpg" width="650" /><br  />Lúc này bạn hãy thoát khỏi phần mềm, một cửa sổ thông báo hiện ra với nội dung “Bạn có muốn bỏ dữ liệu vừa cứu không?” Chọn&nbsp;<code>No</code>&nbsp;nhé, không là công cốc đấy.<br  /><img alt="17" height="121" src="https://tienthanhltd.com.vn/uploads/news/2019_08/17_1.jpg" width="366" /><br  /><strong>Note:</strong>&nbsp;Thực chất là ổ đĩa này mới chỉ được Mount ra, và nó sẽ biến mất sau khi bạn Restart&nbsp;lại máy tính. Chính vì thế bạn hay copy hết dữ liệu quan trọng ra USB, ổ cứng rời… nhé.</span></span><br  /><span style="font-size:24px;"><span style="font-family:Times New Roman,Times,serif;"><strong>4. Lời kết!</strong></span></span></p><p><span style="font-size:18px;"><span style="font-family:Times New Roman,Times,serif;">Trên đây là 2<strong>&nbsp;cách cứu dữ liệu bị ghost nhầm</strong>&nbsp;mình thấy rất hiệu quả vì nó đã được kiểm nghiệm thực tế và cho ra kết quả rất tuyệt vời. Nếu như bạn đang rơi vào trường hợp này thì xin chúc mừng bạn đã đọc được bài viết này 😛</span></span></p><p><span style="font-size:20px;"><strong><em><span style="font-family:Times New Roman,Times,serif;">Hi vọng bài viết sẽ hữu ích với bạn, chúc các bạn thành công!</span></em></strong></span></p>
		</div>
				<div id="author">
						<p>
				<strong>Nguồn tin:</strong>
				Công ty TNHH Thương Mại Quốc Tế Tiến Thành.:
			</p>
		</div>
	</div>
	<div id="footer" class="clearfix">
		<div id="url">
			<strong>URL của bản tin này: </strong><a href="https://tienthanhltd.com.vn/news/tin-tuc-su-kien/lam-the-nao-de-cuu-du-lieu-bi-ghost-nham-hdd-69.html" title="Làm thế nào để cứu dữ liệu bị ghost nhầm HDD?">https://tienthanhltd.com.vn/news/tin-tuc-su-kien/lam-the-nao-de-cuu-du-lieu-bi-ghost-nham-hdd-69.html</a>

		</div>
		<div class="clear"></div>
		<div class="copyright">
			&copy; Văn Phòng Phẩm, Máy Văn Phòng Tiến Thành - CÔNG TY TNHH TM QUỐC TẾ TIẾN THÀNH
		</div>
		<div id="contact">
			<a href="mailto:mxt002@gmail.com">mxt002@gmail.com</a>
		</div>
	</div>
</div>
        <div id="timeoutsess" class="chromeframe">
            Bạn đã không sử dụng Site, <a onclick="timeoutsesscancel();" href="https://tienthanhltd.com.vn/#">Bấm vào đây để duy trì trạng thái đăng nhập</a>. Thời gian chờ: <span id="secField"> 60 </span> giây
        </div>
        <div id="openidResult" class="nv-alert" style="display:none"></div>
        <div id="openidBt" data-result="" data-redirect=""></div>
<script src="https://tienthanhltd.com.vn/assets/js/jquery/jquery.min.js"></script>
<script>var nv_base_siteurl="/",nv_lang_data="vi",nv_lang_interface="vi",nv_name_variable="nv",nv_fc_variable="op",nv_lang_variable="language",nv_module_name="news",nv_func_name="savefile",nv_is_user=0, nv_my_ofs=-4,nv_my_abbr="EDT",nv_cookie_prefix="t28bc_s1kMe",nv_check_pass_mstime=1738000,nv_area_admin=0,nv_safemode=0,theme_responsive=1,nv_is_recaptcha=0;</script>
<script src="https://tienthanhltd.com.vn/assets/js/language/vi.js"></script>
<script src="https://tienthanhltd.com.vn/assets/js/global.js"></script>
<script src="https://tienthanhltd.com.vn/assets/js/SmoothScroll.js"></script>
<script src="https://tienthanhltd.com.vn/themes/default/js/news.js"></script>
<script src="https://tienthanhltd.com.vn/themes/default/js/sticky-sidebar.js"></script>
<script src="https://tienthanhltd.com.vn/themes/default/js/main.js"></script>
<script src="https://tienthanhltd.com.vn//code.tidio.co/0oeiaqm3amrvxuupjhbgwcbdeq5btbh0.js"></script>
<script src="https://tienthanhltd.com.vn/themes/default/js/bootstrap.min.js"></script>
</body>
</html>